If you have a DIY bent and you don't want to book your MacBook in at an iStore, here's a step-by-step guide on how to replace a MacBook Pro battery and how to replace a MacBook Air battery, if that's your model. You'll need some specialized tools that you can easily get on Back Market, a steady hand, and a careful, methodical approach.
✨ How to replace a MacBook battery
Replacing a MacBook battery is quite a technical process, but it's not difficult. Just know before starting that since Apple doesn't sell batteries to customers or suppliers, you'll void your warranty by inserting a non-Apple battery. That said, if your battery has failed, then your laptop is probably out of warranty already. Then it makes good sense to do it yourself rather than paying iStore prices. It's a delicate and detailed operation involving several steps and an iFixit toolkit. But with patience and precision it's entirely doable.
Why you can trust this guide
We've been one of the world's leading marketplaces for refurbished tech for a long time, constantly gaining detailed knowledge of a wide array of electronics, including MacBooks. Our verified third-party refurbishers share their insights with us, too. Armed with all of this information and hands-on experience, we're able to create accurate how-to guides.
While you can fully trust these guides on how to replace and MacBook Pro battery and how to replace a MacBook Air battery, you need full disclosure. Please be aware that fixing your device yourself may void the manufacturer warranty. We recommend reviewing your warranty terms before proceeding with any repairs or replacements.
You'll also be installing a non-Apple battery that comes with the toolkits we recommend. However, this doesn't compromise its quality. IFixit kits are made to the highest benchmarks and extensively tested.
FAQs
We'll split this guide into two parts: one for MacBook Pro owners, the other for people who have a MacBook Air. It covers the later models that most people now own, which have likely run out of their 1-year warranty by now. First, we'll give you a step-by-step guide on how to replace a MacBook Pro battery, then do the same thing to show you how to replace a MacBook Air battery.

How to replace a MacBook Pro battery: each step explained
To replace your MacBook Pro battery, you'll need the appropriate tools. We recommend the iFixit toolkits. They contain everything you'll need, including eye and hand protection:
Safety glasses
2x nitrile gloves
Cleanroom wipe
Adhesive remover
Spudger
Suction handle
iFixit opening tool
6x opening picks
2x plastic cards
Angled tweezers
Plastic dropper
Precision bit driver with four 4 mm precision bits: Pentalobe P5, Torx T3, Torx T5, Torx Security TR8
New battery
Learn about our partnership with iFixit to fight disposable tech.
Step 1: Remove the lower casing
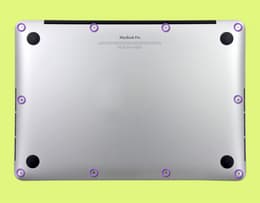
The pentalobe screws are on the edge of the frame.
The first thing you need to do is separate the lower casing from the screen module of your Mac. Before you do that, make sure that your battery has less than 25% charge. If not, you face the risk of a fire if your hand slips and damages the battery.
Switch off your Mac and unplug it, then turn it upside-down and lay it on a flat surface. You'll see pentalobe screws running along the edge. Unscrew them with the Pentalobe P5 bit attached to the bit driver.
Take the suction handle and place it between the screw holes at the center of the front edge of the case. Then lift it slightly, just enough to create a small gap to insert an opening pick. Push a pick gently into the gap and slide it around the right corner and halfway up the side. That releases a hidden clip – you should hear and feel this. Then do the same thing on the left side. Now slide the pick along the back edge. You'll feel two more clips that take a bit more pressure to release. You can now remove the lower case. Firmly but gently pull it towards you, away from the back edge. Alternate between pulling from the left and right corners and make sure that it's completely detached before lifting it off.
Step 2: Disconnect and remove the trackpad
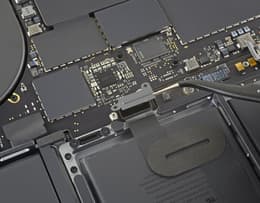
Locate the trackpad cable bracket.
Next, remove the trackpad. This requires a sequence of delicate steps, but it's pretty easy now that you have the right tools. First, find the battery board data cable connector. It's in the middle of the lower part of the laptop, just above the battery. Use the tweezers to remove the tape covering it. This will expose a locking flap. Gently lift it with the spudger. Take the tweezers and slide the battery board data cable out of its socket.
Locate the two screws that hold the trackpad cable bracket down in the center. Remove them with the Torx T3 bit. Lift the cable bracket with the tweezers. Beneath it, you'll see the trackpad cable press connector. Disconnect it by prying it up with the spudger. Finally, slowly peel off the trackpad cable, breaking the adhesive.
Step 3: Disconnect the battery
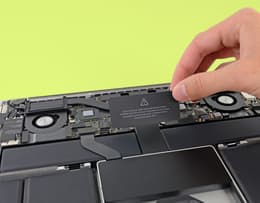
The next step is to disconnect the battery board.
You've now exposed the battery board between the two center battery blocks. With the spudger, very gently lift the small black locking flap that protects the battery board data cable connector. Then slide the battery board data cable out of its socket to disconnect it. Use the tweezers to remove the cable.
Get the Torx T5 driver and unscrew the wide-head screen where the cable was previously. This loosens the battery connector. Take the spudger and lift the battery connector to disconnect it.
Step 4: Take out the trackpad
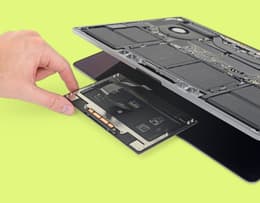
Slide out the trackpad.
Now you can loosen the trackpad and remove it. Look for the ten or so screws that secure the trackpad frame along its edges, on either side and below the battery blocks, and use the Torx T5 bit. After that, while keeping the laptop upside down, open the screen a little. This should dislodge the trackpad. You'll see a ribbon cable running through a slot in the bottom frame attached to the trackpad. Gently slide it out and remove the trackpad.
Step 5: Remove the battery board
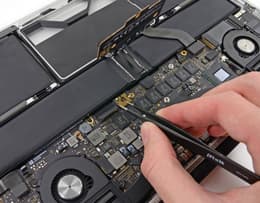
The battery board runs the length of the bottom area.
The battery board spans the length of the part of the casing, usually split into 4 blocks. Remove the gold screw between the two center blocks using the Torx T5. The battery board is attached to the frame by several stretch release adhesive strips. Follow this procedure for each:
Grab the black pull tab with the tweezers.
Gently pull it out horizontally with your fingers.
Do it slowly to give the strip time to stretch and release from the adhesive.
Now take the plastic card and use it to pry the battery blocks up from the frame, slicing the adhesive as you do so. Once this is done, you can slide the battery out of the frame.
Key takeaways and troubleshooting tips
Step | ✨ Remember | Troubleshooting |
|---|---|---|
1. Removing the lower casing | Put on the nitrile gloves to protect your hands from the sharp edges of the lower case. | Remember where each pentalobe screw goes and put them safely aside, in the order that you removed them. |
2. Disconnecting the trackpad | These are small delicate components, so work slowly and carefully. | If you can't break the adhesive on the trackpad cable, you can use a drop of adhesive remover. Make absolutely sure that the liquid doesn't touch any of the logic board components. |
3. Disconnecting the battery | The battery board cable connector is a tiny gold square with ridges. | If you have trouble removing the data cable, loosen the adhesive underneath using blunt-nosed tweezers. |
4. Removing the trackpad | Open the screen slowly to prevent damaging the ribbon cable. | There are tiny washers underneath the screws that can easily get lost. Keep track of them as you remove each screw. |
5. Removing the battery board and inserting new battery | Insert the new battery and follow these steps in reverse to reassemble your Mac. | If you can't slice through the battery board adhesive with the card, drop a tiny bit of isopropyl alcohol onto the area to dissolve it. |
How to replace a MacBook Air battery: step-by-step
Replacing a MacBook Air battery is simpler, with fewer steps, and you won't have to remove the trackpad.
First, fully discharge the battery and turn off your laptop. Then turn it upside-down. Also make sure you have all the right tools. An iFixit MacBook Air battery replacement kit contains:
Spudger
Angled tweezers
Precision bit driver with four 4mm precision bits: Pentalobe P5, Torx T3, Torx T5, Torx Security T4
New battery
Step 1: Detach the lower casing
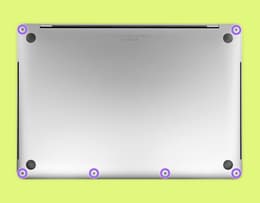
Look for the pentalobe screws on the edges of the frame.
Removing a MacBook Air lower casing is quicker and easier than with a MacBook Pro. You don't need any picks. Simply remove the pentalobe screws with the Pentalobe P5 bit, then grasp the edge of the lower case with your fingers and pull it off.
Step 2: Disconnect the battery
Take the spudger and use it to push up the locking arm of the battery connector. Then lift the whole connector so that it detaches from its socket.
Step 3: Take out the audio speakers
Now you need to remove both speakers from the lower casing. This may sound a little daunting, but it's pretty simple. To begin, remove the audio board connector cover in the extreme bottom left corner of the lower casing. The Torx T3 driver bit is meant for this. Then use the tweezers to lift off the cover.
Now you can disconnect and remove both speakers. The process is the same for each. Slide the spudger under the tiny speaker cable housing on the left side of the speaker on your left. Gently pull it straight up to disconnect the speaker cable. Then remove the main speaker screw further to the right with the Torx T3 bit.
The speakers have the same stretch-release adhesive strips underneath them as the Macbook Pro. As with those, use the tweezers to lift the black pull tab, hold it between your fingers and gently pull out the strip. Once the strip is out, you can just lift and remove the speaker. Repeat this process with the right speaker.
Step 4: Remove the trackpad cable
In the middle of the bottom part of the casing you'll see the trackpad cable cover, attached by a screw on either side. Loosen these with your Torx T3 bit and remove the cover. Then find the cable connector and lift it out of its socket using the spudger. Once the trackpad cable is disposed of, it's simply a matter of peeling it off the battery by breaking the light adhesive bond.
Step 5: Taking out the battery
The battery case is secured on either side of the lower casing by a screw located halfway each side. Unscrew them using the Torx T3. Now follow the same procedure described above to lift the black pull tabs underneath the battery board and pull out the stretch strips. Once that's done, you can lift out the battery.
Key takeaways and troubleshooting tips
Step | ✨ Remember | Troubleshooting |
|---|---|---|
1. Detaching the lower casing | It's simple and quick to remove the lower casing of a MacBook Air with your fingers. | If you have auto-boot on, switch it off before you power down your Mac. If not, it can automatically start the laptop up when you open the lid. |
2. Disconnecting the battery | Use the flat side of the spudger for easier access. | If the locking arm doesn't easily detach, check to see if it's stuck on the locking tab. |
3. Removing the speakers | Keep the adhesive strips parallel to the laptop when pulling – don't pull in an upwards direction. | If the adhesive is stubborn, use a hairdryer to soften it and then gently slide the spudger under it to loosen. |
4. Removing the trackpad cable | Work very carefully so as not to damage this slender cable. | If you can't get the trackpad cable off using gentle pressure, you can slide a pick underneath it to detach the adhesive. |
5. Taking out the battery | To install your new battery, follow the steps in reverse order. | If you break a stretch strip, you can also use a thin plastic card to lift the battery from its casing. |
The refurbished alternative
If you'd rather get yourself an upgraded or replacement MacBook, you can save a good deal by buying a refurbished one. These work every bit as well as new ones, because they've been completely overhauled and restored by our verified third-party refurbishers. Damaged components have been replaced with new ones, and they've been deep cleaned. A series of rigorous tests follows to ensure that these MacBooks perform up to the same standards as the original new benchmarks. We sell them at prices that can save you up to 50% over a new one. Not only that – you also have peace of mind from our 1-year warranty. We have various MacBook Pro and MacBook Air models for you to choose from.
Trade in your old MacBook
There's no need to get rid of your old MacBook with its defective battery. You can trade it in on Back Market for quick cash. We make it quick and easy. Just give us the specs in a short online form and you'll instantly get an offer from one of our refurbishers. Like what you see? Then we'll pay for you to ship us your MacBook and you'll have your money within five working days. You can trade in any other electronic devices too.
Refurbished MacBooks that save you money
Have a look at the savings to be had on some of our MacBook models:
Product | New Price | Back Market Price* | Savings (%) |
|---|---|---|---|
~ $1,299.00 | From $649.00 | 50.04% | |
~ $1,599.00 | From $975.00 | 39.02% | |
~ $3,999.00 | From $3,417.00 | 14.55% | |
~ $1,199.00 | From $649.99 | 45.79% | |
~ $1,099.00 | From $741.00 | 32.58% |
*Back Market prices taken at the date of publication – these are subject to change.
To summarize
Given the right tools, patience, and focus, it's not difficult to remove and insert the battery of a MacBook. With the steps we've given you, you'll now know how to replace a MacBook Pro battery and how to replace a MacBook Air battery, depending on which version you own. An iFixit toolkit contains everything you'll need to get the job done.
