MacBooks
Updated on December 19, 2025
December 19, 2025
12 mins read
Miguel G.
Sr. Tech Copywriter (US)
Most of us use our earbuds or headphones daily when hitting the gym, commuting to work, and enjoying our latest gaming release. However, for something we use so often, many of us don’t know how to clean earbuds and headphones effectively to remove the dirt, oil, and bacteria they accumulate.
If you’ve noticed that your earbuds or headphones are showing signs of wear, such as muffled sound, strange smells, or visible debris, it's time to learn how to clean them. Our latest article explores the quick and easy steps to take so you don't get the ‘ick’ every time you put them in or on your ears.
✨ Pop off your ear tips, give them a quick clean (use soapy water for silicone and a damp cloth for foam), gently brush the mesh while holding your buds upside down, wipe the casing with a lightly alcohol-dampened cloth, and don’t forget to sweep out the charging case. For headphones, remove and clean the pads, wipe the headband and hinges, dust the grilles, let everything dry, and then reassemble for hygienic, great-sounding gear.
We’ve been in the tech refurbishment game long enough to offer expert insights into cleaning your earbuds and headphones. The tech experts at Back Market routinely clean and restore tech, breathing new life into each device.
Every earbud or headphone set we receive goes through rigorous professional cleaning. We know precisely how to clean headphones and earbuds, what tools to use, and what materials and cleaning supplies are safe.
The steps we’ve shared in this article are ones we would use ourselves to ensure earbuds and headphones are cleaned correctly. We’ve adapted these steps based on manufacturer guidelines and our own real-world refurbishment experience.
With our help, you’ll know exactly how to clean earbuds and headphones in the future, ensuring they last longer and continue to provide a high-quality listening experience, regardless of their intended use.
Learn how to clean your earbuds and headphones like a pro.
Before we get into the nitty-gritty of the steps you need to know to clean earbuds and headphones, we wanted to give you a quick overview of what to expect.
In the step-by-step guide, we’ve divided the steps into two sections: how to clean earbuds and how to clean headphones, so you can easily find the one that best applies to your situation.
We've also mentioned the cleaning supplies and methods you’ll need, as various earbud and headphone materials, such as plastic, mesh, and leather, require careful handling. The last thing we want is for you to wreck your headphones or earbuds, leaving you cursing our advice.
To make things easier for you, below we've provided a brief list of the basic tools you'll need if you plan on getting your hands dirty while you follow our step-by-step instructions:
Microfiber cloth
70% isopropyl alcohol
Cotton swabs
Soft-bristle brush
Dry lint-free cloth
Armed with these tools of the trade and the appropriate cleaning knowledge, you’re ready to begin learning how to clean in-ear headphones and over-ear headphones. We also gave insight into our trade-in program and why buying refurbished is a better option when ‘clean’ isn’t enough.
Here is our easy at-home step-by-step guide to cleaning your earbuds. You’ll need some of the tools we mentioned, a little elbow grease, and your headphones may be good as new. Unless they are already on their way out, and if that's the case, we’ve got clean, refurbished ones ready — no judgment!
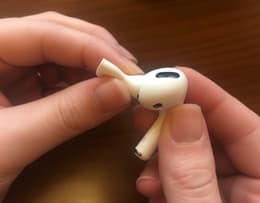
Taking off the tips and accessories to reveal hidden dirt before cleaning.
The first step is to remove any silicone or foam tips from your earbuds, as well as any extra hooks or covers. When you do this, you’ll get to see all the hidden spots where dirt loves to hide, making your job of cleaning your earbuds much easier.
But popping these tips off isn’t only to give you better access to dirty spots; it also makes the cleaning easier, so you don't transfer dirt between parts while you work.
One super important piece of advice we can offer during this step is to keep your tips and accessories in a small dish, so you don’t lose anything mid-clean.
✨You’ll need to remove the earbuds tips and any accessories to reveal where they need cleaning and keep them somewhere you can easily find them.
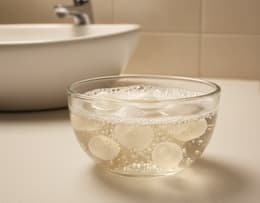
Giving silicone tips a quick soak for a fresh start — foam tips get a gentle wipe instead.
Under no circumstances should you submerge your earbuds in soapy water, as this is the quickest way to damage or destroy them. However, if your earbud tips are silicone, you can give them a quick dip in warm, soapy water.
After dipping them and leaving them for a short while, you can remove them and rinse them before letting them air dry. If your earbud tips are foam, you cannot do this. Instead, wipe them gently with a cloth that has been slightly dampened.
And make sure that after you’ve cleaned the earbud ear tips, they are completely dry before you put them back on the earbuds to avoid moisture damage.
✨ Foam ear tips should be wiped with a damp cloth, while silicone ear tips can be dunked and washed in warm, soapy water. Both must be bone dry before being put back on your earbuds.
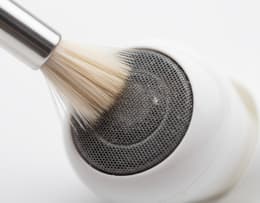
Gently brushing away earwax and dust while holding the earbuds upside down.
With the ear tips cleaned, the next step is to brush the metal to get rid of the gunk that likes to accumulate in it. We recommend using a dry, soft-bristle brush for this.
You’ll want to hold the earbuds upside down and sweep away earwax or dust from the mesh gently, and please…avoid thinking of things that make you angry because brushing too vigorously will cause damage or push the dirt deeper into the speaker.
We can refurbish many things, but not everything. Damaging your earbuds means you can't trade them in with us for cash towards your next set when you’re ready.
✨ To prevent damage, gently tilt your earbuds downwards and brush away dirt.

Using a cloth with a touch of alcohol to clean the exterior without harming the electronics.
Now it's time to bust out the cleaning alcohol. You’ll want to take your 70% isopropyl alcohol and use it to dampen a microfiber cloth. Be careful not to drench the cloth, as this could damage the earbuds.
Take the cloth and wipe the outer casing clean. If you encounter stubborn spots, you can lightly dampen a few cotton swabs and use them to treat these areas gently. With a bit of elbow grease – nothing too vigorous – and careful swiping, the casing will be clean in no time.
✨ Use an alcohol-dampened cloth or cotton swabs to clean away dirt and germs from your earbuds and their casing, being careful not to let the alcohol get into the earbud speakers.
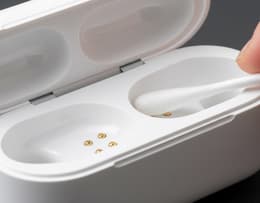
Removing lint and grime from the charging contacts and corners.
The last step is to clean the charging case, if your earbuds come with one. To clean the case, first remove lint and dust with a dry cotton swab. Then you need to tackle the corners. Using a toothpick wrapped in cloth, you can remove the dirt.
However, when doing this, be careful not to let dirt get into the charging port. We recommend cleaning the case regularly to extend the life of your earbuds' battery contacts.
✨ Cleaning the case is easy with a toothpick and cotton swabs. You’ll want to clean it often to extend its lifespan.
Whether you need to learn how to clean Sony headphones or how to clean Bose headphones, the steps are the same, and we’ve shared them below. Much like with cleaning the earbuds, you’ll need a few of the tools we mentioned, and an iron will to get the job done right.
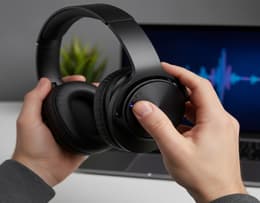
Shutting down and unplugging before cleaning to keep everything safe.
Start by powering down your headphones and disconnecting any cables that might be attached to them. You’ll want to do this before cleaning them, as it helps avoid accidental button presses and keeps moisture away from sensitive circuits. You should also take out batteries if your headphones use them to be extra safe.
✨ Unplug everything and remove any batteries if present to keep you safe and avoid accidental damage to your headphones.
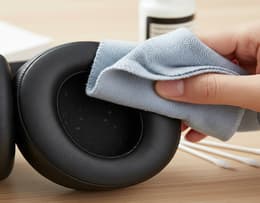
Wiping down pads with water or alcohol, depending on the material.
If possible, remove the pads from your headphones next. You’ll want to wipe them with a cloth dampened with mild, soapy water if the earpads are faux leather or genuine leather. If your earpads are made of foam or fabric, you can clean them with a lint roller or a lightly dampened cloth.
When ear pads cannot be removed, you will still follow the same steps, but you must be more careful. And although it may be tempting, never ever soak headphone ear pads, as the moisture can loosen or warp them.
✨ If possible, remove the ear pads from the headphones and clean them with a cloth dampened by mild soapy water or a lint roller, depending on the material.
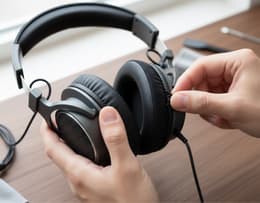
Removing dirt and product buildup from the headband and hinges.
With the ear pads out of the way, it's time to move on to cleaning the headband and exterior. Using a microfiber cloth, wipe the exterior surface of the headphones and pay extra attention to the folding joints and hinges where grime loves to hide.
If dirt proves stubborn, wet the cloth with a bit of alcohol and pay extra attention to spots where skin oils and hair products accumulate grime.
✨ Gently wipe away dirt on the headphones' exterior with a microfiber cloth, focusing on tough-to-remove dirt spots.
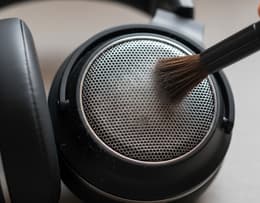
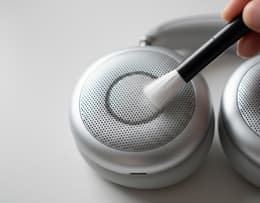
Brushing dust off gently so nothing gets pushed inside.
You’ll want to use a soft, dry brush next to lift dust from the mesh or grilles. We recommend keeping your strokes gentle and avoiding pressing debris deeper into the speaker. You’ll want to remember to also always brush away dirt at an angle so that dirt falls away from the interior and doesn’t ruin all your hard work.
✨ Clean mesh or grills at an angle with a soft brush, gently sweeping away dirt while being careful not to allow dirt to mess places you have already cleaned.
Making sure all parts are dry before putting everything back together.
The final step in cleaning your headphones is to let all parts air dry for at least 30 minutes before reassembling them, unless you did a quick clean, in which case there’s no need to wait this long. You’ll need to reattach pads, batteries, and cables. After you’ve done this, you can power up your headphones and enjoy clearer audio quality.
✨ Quick cleans require less waiting time once the headphones are reassembled, whereas deep cleans necessitate at least a half-hour for the headphones to dry before reassembly and use.
Have you cleaned your earbuds or headphones and come across a few issues you don't like, like sound quality that still isn’t delivering what you need it to? Or do they look worse for wear even after a good clean? If so, it might be time to consider buying a refurbished set.
Choosing to buy refurbished earphones or headphones means you’ll be getting a clean, tested, and restored set that is almost as good as new for a fraction of the price of new. At Back Market, our earbuds and headphones aren’t junk. You won't receive a faulty set that sounds tinny, has loose cabling, a broken battery, or finicky charging ports. You’ll get headphones or earbuds that work as they should; that’s a promise.
Our verified-refurbished earbuds and headphones come with a competitive industry warranty of one year and a 30-day guarantee. This isn’t something you’ll easily find elsewhere, and we offer it because we trust our technology and the professionals who refurbish it.
So why not take a chance on gear that's been given a second life and save money while helping reduce tech waste that ends up in landfills? You’re unlikely to regret your decision.
We get it. Sometimes, a new set of earbuds or headphones can seem out of reach due to the price tag attached to them. Fortunately, if you have a headset or earbuds in mind, there's a high chance you’ll get it cheaper at Back Market, and we can sweeten the deal with our trade-in program.
By participating in our trade-in process, you’ll get quick cash back into your back pocket or store credit. The process is also uber easy.
You’ll get a quote, you’ll ship us your old set if you approve the offer, and then we’ll get you paid up after we receive your old headphones or earbuds. Additionally, trading in your headphones or earbuds comes with the added benefit of doing your part to help save the planet, as fewer sets will end up in landfills.
If you're on the fence – or a small step closer to the ground – about buying a set of earbuds or headphones to replace your current pair, the price comparison table below might help you make up your mind:
Model | Refurbished | New | Savings |
|---|---|---|---|
$126* | $169.00 | 10.65% | |
$227.00* | $489.99 | 53.67% | |
$159.00* | $678.00 | 76.55% |
*Back Market prices taken at the date of publication—these are subject to change.
Now you know how to clean your headphones or earbuds without risking damaging them. We know it's not always something you’ll want to do, but maintaining a steady cleaning schedule is essential. Cleaner gear means better sound and a longer lifespan, which is something you want, considering they can be pricey.
Plus, it doesn’t take long, so don't be lazy. Bust out the cleaning rags, warm soapy water, and alcohol, and get busy. But if your headphones or earbuds have seen better days, it might be time to retire them. There is only so much that cleaning can do.
So, if your current pair is beyond repair, consider buying a refurbished set from Back Market or trading it in for store credit or cash that you can use towards a new pair or something else. We have something for everyone, and by 'everyone,' we mean you.

Miguel is always looking for new ways to provide unique perspective on popular tech and has taken his writing to the refurbished industry to promote sustainability. Outside of creating content, you might find him travelling the globe, coaching a fitness class, or cheering on his favorite sports teams (Go Dolphins!)