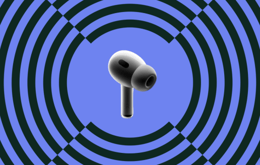
Headsets & earphones
Updated on May 2, 2025
May 2, 2025
9 mins read
Miguel G.
Sr. Tech Copywriter (US)
Apple AirPods provide seamless integration to the Apple ecosystem, but this doesn’t mean you won’t sometimes encounter difficulties connecting them to your MacBook. In this how-to guide, we’ve explored connecting AirPods to a MacBook with minimum fuss because we know you don’t have all day to troubleshoot issues.
Not everyone has what it takes to provide guidance on Apple troubleshooting issues, but we do at Back Market. We know Apple devices inside and out — after all, we know enough about them to ensure they perform like new, including AirPods and MacBooks.
Our close collaboration with top professionals who have experience testing Apple devices allows us to guarantee reliability and quality. You can trust that we have the knowledge and the skills to provide expert knowledge on troubleshooting issues surrounding AirPods not connecting to MacBooks as they should. We also have the technical know-how, which gives us the skills to articulate how best to approach your connectivity issues.
Every recommendation or proposed solution in this guide about connecting your AirPods to a MacBook is backed by real-world, hands-on experience and a deep understanding of Apple's ecosystem. We are not simply providing generic advice that you could get from a simple Google search; we’re offering effective, practical, and easy-to-understand solutions.
Many of us have trouble connecting AirPods to a MacBook at some time or another. Often, it’s not even our fault that our devices are on the fritz connectivity-wise. Fortunately, it's not hard to connect AirPods to a MacBook if you know how. In addition, there’s always the option of buying refurbished. This is a great solution if you want a more affordable, sustainable option than buying new.

Check your Bluetooth settings and your AirPods’ battery life.
“Forget” your AirPods on your MacBook and then reconnect them.
Try restarting your MacBook and checking for updates.
Check your sound settings and force your Mac to recognize your AirPods.
Consider resetting your AirPods if nothing else seems to be working.
AirPods not connecting to a MacBook is a more common issue than you might think. Now, we know that Apple would have you believe otherwise since their tech is supposed to work seamlessly within its ecosystem, but it's tech; there are bound to be issues.
So, if your AirPods are not connecting to your MacBook, have a look at the troubleshooting steps our experts at Back Market recommend before you let frustration get the best of you.
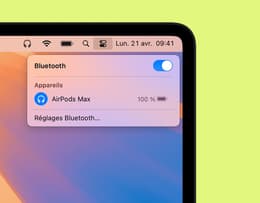
Learn how to use Bluetooth to connect your AirPods to your MacBook.
Before you try anything else, the first thing you need to do in the troubleshooting process is check your Mac’s Bluetooth connectivity and your AirPods’ battery life. To do this, follow these steps:
Turn your Bluetooth off and back on. Go to Settings and navigate to Bluetooth. Once you’ve found it, toggle it off and then back on.
Next, you need to charge your AirPods. Sometimes, having a low battery can cause connectivity issues. To rule this out, put your AirPods back in their case for about 10 minutes and let them charge before you try to connect again.
Pro Tip: You can test your Bluetooth on your MacBook by trying to connect to another device, like a wireless speaker or mouse. If the other device struggles to connect to your Mac over Bluetooth, it could indicate that the issue is with your MacBook and not your AirPods.
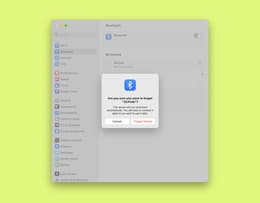
Remove and re-add your AirPods to fix connectivity issues.
When the Bluetooth solution fails, the next step is to “forget” and then reconnect your AirPods to your MacBook. So, if your AirPods are recognized but they won't connect, this is how you remove and re-add them:
Open your System Settings and navigate to the Bluetooth menu.
Look for your AirPods in the list of connected devices, click (i), and then choose “Forget This Device”.
Once the AirPods are forgotten, close the lid and place them in their case. Wait at least 30 seconds.
Then, open the lid and press and hold the setup button, which you will find on the back of the case. You will hold this button down until the light flashes white.
After you’ve seen the light flash, navigate back to the Bluetooth settings menu on your MacBook and reconnect your AirPods.
Pro Tip: Before you remove your AirPods from the connected devices list, check your MacBook model year and the macOS version. At times, newer AirPod models can experience difficulties connecting to MacBooks because of macOS compatibility issues. You can determine if this is the case by navigating to the Apple Menu and then searching for “About This Mac”. Once on this page, you can see your model year and macOS version. If your devices are incompatible, it might be time to purchase refurbished AirPods or a MacBook from Back Market.

Restarting your MacBook can clear temporary Bluetooth issues.
If compatibility and Bluetooth are seemingly okay, you must move to step three in the troubleshooting process. For step three, you need to restart the system. Often, a quick restart of your MacBook can refresh Bluetooth connections. Follow these steps:
Navigate to the Apple Menu on your MacBook and click “Restart”
After your MacBook has rebooted, connect your AirPods using Bluetooth again, as we advised you in step one.
Pro Tip: Should your MacBook be slow to restart, a pending software update could cause a connectivity problem with your AirPods. To check this, navigate to System Settings and find “General”. Once you’ve found “General”, navigate to the Software Update menu. If you see a pending update, click it and let it run. Sometimes, this can resolve the issue and allow you to connect AirPods to a MacBook.
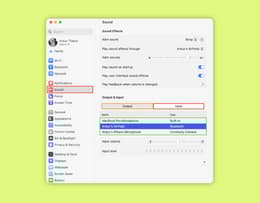
Ensure your MacBook is using AirPods for audio.
One of the most frustrating things is when our AirPods say they are connected, but the audio is still playing through the MacBook speakers instead. Fortunately, this should be a relatively easy fix:
Open your System Settings on your MacBook and search for “Sound” before navigating to the Output menu.
Once in the Output menu, select AirPods as the output device.
Pro Tip: You can force your MacBook to recognize your AirPods on the Output menu if it is not picking them up. To do this, try switching between output devices like your built-in speakers and then back to your AirPods. It should do the trick.

Resetting your AirPods can resolve stubborn connection problems.
If all else fails, you can try resetting your AirPods. A full AirPod reset might be necessary, unfortunately, if they won’t connect after taking the previous steps we outlined. To perform a full reset, follow these steps:
Put your AirPods back in their case. Close the lid for 30 seconds.
Open the lid of the case and press and hold the setup button on the back of the case for 15 seconds. Keep holding it down until the light flashes amber and then white.
Then, you can try reconnecting your AirPods by pairing them again, as we mentioned in step two.
Pro Tip: Sometimes, it can help to remove your AirPods from all the Apple devices you use, not just your MacBook, before you reset them. Removing them from multiple devices can help you avoid lingering connection issues and prevent the need for a hard reset.
Sometimes, we must accept defeat — it’s a fact that AirPods aren’t made to last forever. If you’ve tried all the steps we shared above and are still having trouble connecting your AirPods to your MacBook, it might be time to consider buying another pair.
Instead of purchasing new, however, why not consider buying refurbished? In years gone by, refurbished tech has gotten a bad reputation, but companies like Back Market are showing the world just how much of a positive impact refurbished tech can have on both your wallet and the world.
For starters, refurbished tech is much better for the environment, and by choosing refurbished AirPods instead of buying new ones, you’re doing your part to reduce your carbon emission output. Buying refurbished means keeping electronics out of e-waste landfills, where more than 62 million metric tons of electronic waste have unfortunately found a home.
Secondly, buying refurbished is better than purchasing used because you’ll receive AirPods that have been professionally restored, tested, and verified. Unlike “as-is” products, you’ll have the reassurance that your AirPods have gone through an extensive quality assurance process.
Everything from battery health checks and deep cleaning to performance testing has been completed during this process to ensure they function flawlessly.
Additionally, buying refurbished devices is significantly more affordable than buying new ones from Apple by about 30% to 50%. And the cherry on top? You’ll receive a one-year warranty on refurbished AirPods, meaning you’ll receive a great listening experience alongside peace of mind, which is priceless.
You'll benefit from our AirPod Trade-in program when you buy refurbished. When you choose to trade in your old tech, it not only helps you save money, but it also helps support a more sustainable tech industry.
Back Market’s Trade-in program makes selling your old AirPods easy and gives you cash back that you can use toward your next pair. We offer incredibly fair pricing, competitive quotes, and free shipping. When you think about it, it's the trifecta of trade-in programs and means you’ll enjoy a hassle-free trade-in process.
If you are looking to get your next AirPods or your first-ever pair, Back Market is a great place to start your research. With prices, you can count on and professionally refurbished devices you can trust, browse some of our best deals:
AirPods model | Back Market price |
|---|---|
AirPods 1 | $79.38 |
AirPods 3 | $45 |
AirPods Pro 1 | $94.49 |
AirPods Pro 2 | $126 |
Now you know that connecting AirPods to a MacBook is not as difficult as you might have been led to believe. With the troubleshooting steps we shared, you should have no issues connecting your AirPods to your MacBook. Each of the troubleshooting steps we shared should easily tell you what to do depending on the nature of your connectivity issue, and our pro tips are there to give you additional insight.
If nothing seems to be working, however, you might want to begin exploring your options — one of them being buying refurbished AirPods. With Back Market, you can purchase a set of AirPods with premium functionality and pay less by capitalizing on our trade-in process. By trading in old tech, you’ll get money back to buy a refurbished set of AirPods, and you’ll be helping to keep tech waste out of landfills.
Sound good? Have a look at our different AirPod models. We’re bound to have something for your needs, preferences, and budget.

Miguel is always looking for new ways to provide unique perspective on popular tech and has taken his writing to the refurbished industry to promote sustainability. Outside of creating content, you might find him travelling the globe, coaching a fitness class, or cheering on his favorite sports teams (Go Dolphins!)