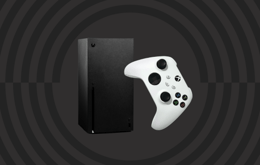
Game consoles
Updated on December 19, 2025
December 19, 2025
23 mins read
Miguel G.
Sr. Tech Copywriter (US)
When you’re battling against your friends on your Xbox, the last thing on your mind is the dust and dirt on your console. Properly cleaning your Xbox is the best way to maintain it and prevent damage from dust build-up. Take some time to give your Xbox the cleaning it deserves. A good dusting is great for your allergies, helps extend its lifespan, and is easier to do than you’d think. Here’s how to clean an Xbox game console and controller.
✨ Turn off and unplug your Xbox from the power source. Use a soft brush to loosen dust around the vents, ports, and openings, then wipe the exterior with a microfiber cloth. Position the nozzle at the vent and use short bursts of compressed air to clear dust from the cooling fan. For a deep clean, follow the steps below to carefully disassemble your Xbox console. Use your tools to clean the cooling fan, vents, heatsink, motherboard, disk drives, and power supply unit, then reassemble the console.
At Back Market, we’re all about making tech last, which means knowing how to maintain your tech. This guide is based on expert advice and real-world experience refurbishing thousands of consoles. Our goal is to share practical, easy-to-follow steps to help you keep your Xbox Series X/S or Xbox One running smoothly, without guesswork. The steps mentioned in this guide are designed to be beginner-friendly and effective, so you can clean your console confidently and keep it in great shape for years to come.
Keeping your Xbox console clean is essential for maintaining optimal performance and longevity.
To maintain optimal and long-lasting performance from your Xbox gaming console, a cleaning routine is key.
A regular cleaning routine is essential for maintaining your Xbox’s performance. When cleaning your console, focus on the exterior, vents, cooling fan, and heatsink, as well as the motherboard and power supply unit for the Series S, and the motherboard, hard drive, and disk drive for the Xbox One.
Here’s what you’ll need to clean your Xbox console:
A soft microfiber cloth
A soft-bristled brush
Cotton swabs
A can of compressed air
An Isopropyl alcohol (IPA) solution or mild soap and water
Anti-static tweezers
T8 and T10 Torx screwdrivers
A plastic pry tool
Needle-nose pliers
Dust blower
Console | Cleaning Task | Difficulty | Time estimate |
|---|---|---|---|
Xbox Series X | Outside | Easy | 5 to 10 minutes |
Xbox Series X | Inside | Intermediate | 20 to 40 minutes |
Xbox Series S | Outside | Easy | 5 to 10 minutes |
Xbox Series S | Inside | Intermediate | 20 to 40 minutes |
Xbox One | Outside | Easy | 5 to 10 minutes |
Xbox One | Inside | Advanced | 45 to 60 minutes |
Xbox One S | Outside | Easy | 5 to 10 minutes |
Xbox Controller | Outside | Easy | 10 to 15 minutes |
Xbox Controller | Inside | Intermediate | 20 to 40 minutes |

If your Xbox Series X is loud, overheating, or slow, dust may be clogging the fan, heatsink, or vents, so a cleaning is due.
If your console is loud, overheating, or underperforming, chances are it may have dust built up in the heatsink, cooling fan, or main vents. Follow these steps to open and remove dust and debris from your Xbox Series X console.

Gently use a cotton swab in the vent slats to remove dust and debris.
Before you start cleaning, turn off and unplug your console from the power source.
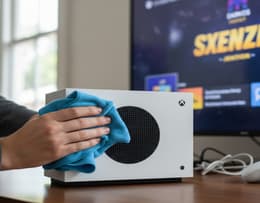
Use a microfiber cloth to gently wipe the exterior to remove dust or fingerprint smudges.
To clean the air vents, gently insert a cotton swab into the vent slats to remove dust or debris. Be careful not to push any dust inside the console.
For those afraid to open the console, you can clean the Series X fan using a can of compressed air. Position the nozzle at the vent and use short bursts of air to remove any dust from the fan.

The first screw is near the base, and the second is halfway up.
Before you start cleaning, turn off and unplug your console from the power source.
Turn your console around to locate the back panel. Use a pair of anti-static tweezers to uncover the two back panel screws. The first screw sits near the base, while the second is positioned halfway down. Peel off the stickers using your tweezers. For the second sticker, you only need to peel it to where you can access the hidden screw.
Use a T8 Torx screwdriver to remove the two screws securing the back panel. As you clean, keep track of all screws and replace them in their original spots to prevent damaging your console.
Use a plastic pry tool to unclip the back panel. Insert the flat edge into the gap between the back panel and shell and gently pry the bottom of the back casing away from the console, then work your way up the sides to the top until the entire rear cover comes off. You’re now inside your Xbox console.
Once inside, the heatsink, cooling fan, and main vent are the three places you want to clean.

Use a T8 Torx screwdriver to remove the screws, then needle-nose pliers for the fan cable connector.
5. Locate the cooling fan and remove the screws holding it in place. There are three screws: two small ones on the extreme left and right, and one large central screw. Use your T8 Torx screwdriver to remove these screws. Then, use your needle-nose pliers to remove the fan cable connector (connects the fan to the power source). You can now slide the fan up and out. Now you can start cleaning.
6. Use a microfiber cloth or soft-bristle brush to remove dust from the fan and its blades. Use a dust blower or compressed air to dislodge stubborn dust. If there’s any grime, wipe it away with a damp rag with soapy water or an isopropyl alcohol wipe.

Using compressed air to safely clean dust from the Xbox Series X heatsink
7. For the heatsink, use a soft brush to loosen the dust, then follow up with a dust blower or compressed air to remove the dust and any trapped debris.
8. Use a soft brush to clean the vents and openings on the shell, then finish with a blast of compressed air. Wipe down all easy-to-reach surfaces and use the brush and compressed air for the harder-to-reach areas.
All done. That wasn’t so hard. Your Xbox Series X console is clean, but now you need to reverse the process and reassemble the console.
Start by first replacing the fan. Slide it into its position, connect the power source, and then replace all three screws. During reassembly, ensure the fan blades are facing the vents (or Master Chief is facing you) and ensure the fan cable is tucked under its small guide on the fan housing to avoid interference with the back panel.
Replace the back panel starting from the top. Secure the two straight points, then work down the sides to snap in the brackets, and finish by pressing the bottom clips into place. Your Xbox Series X is now fully reassembled and clean.
✨When cleaning your Xbox Series X, focus on the exterior, heatsink, cooling fan, and main vents.

If your Xbox Series S is running louder or hotter, it’s time to clean it.
If your Xbox Series S has been louder or hotter than usual, it’s time for a cleaning. An accumulation of dust could lead to your console’s fan running at a higher speed, which results in increased noise and overheating. To avoid this, ensure you clean your Xbox Series S regularly. Follow these steps to open up and remove dust and debris from your Xbox Series S console.
Cleaning the outside
Before you start cleaning, turn off and unplug your console from the power source.
Using a microfiber cloth, gently wipe the exterior to remove dust or fingerprint smudges.
To clean the air vents, gently insert a cotton swab into the vent slats to remove dust or debris. Be careful not to push any dust inside the console.

Position the nozzle at the vent and use short air bursts to clear dust from the internal components.
4. For those who are afraid of opening the console, use a can of compressed air to clean the Series S fan. Position the nozzle at the vent and use short bursts of air to remove any dust from the fan.
Before you start cleaning, turn off and unplug your console from the power source.

Remove the two white stickers near the back ports to reveal the screws.
2. Rotate your console and remove the two white stickers at the back of the console near the connection ports to reveal the screws. Using your T8 Torx screwdriver, remove the two screws.
3. Once removed, turn the console upside down, slide the bottom panel off, and set it aside for cleaning.

Use your T10 Torx screwdriver to remove the seven green screws.
4. To remove the outer shell, use your T10 Torx screwdriver to remove the seven green screws. Once done, push apart the two sides of the plastic shell to detach the chassis. Set the outer shell aside for cleaning.
5. Next, remove the three circuit boards connected to the chassis. Use a T8 Torx screwdriver to take out the screws, then gently wiggle the boards free from their connectors, and set them aside.
6. To access the cooling fan and motherboard, remove the nine silver screws securing the chassis. Then, place the chassis with the fan facing you, lift off the top metal piece, and set it aside for cleaning. You should now see the power supply and cooling fan. Once inside, the heatsink, cooling fan, motherboard, and power supply unit are the places you want to clean.
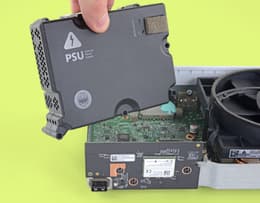
7. Pull out the power supply unit (PSU) and set it aside for cleaning.
8. Using your needle-nose pliers, remove the cooling fan cable connector and set the fan aside for cleaning. You can now start cleaning.
Use a soft brush to loosen dust on the motherboard and fan, then short air bursts to blow it away.
9. Use a soft brush to loosen the dust stuck on the motherboard and fan, and use short bursts of condensed air to blow dust away from the components.
10. Use a microfiber cloth or soft-bristle brush to remove dust from the fan and its blades. Use a dust blower or compressed air to dislodge stubborn dust. If there’s any grime, wipe it away with a damp rag with soapy water or an isopropyl alcohol wipe.
11. For the heatsink, use a soft brush to loosen the dust, then follow up with a dust blower or compressed air to remove the dust and any trapped debris.
12. Use a soft brush to clean the vents and openings on the shell, then finish with a blast of compressed air. Wipe down all easy-to-reach surfaces, and use the brush and compressed air for the harder-to-reach areas.
That's it. Your Xbox Series S console is clean, but now you need to reverse the process and reassemble the console.
Start by placing the fan at the front of the chassis and connecting its cable. Guide the wires through the small hook to keep them clear of the power supply unit.
Reinstall the power supply unit. Ensure the airflow is directed toward the fan and align its feet with the copper areas.
Replace the chassis top metal cover. The soft, “squidgy” bits may create slight resistance, but they help the metal cover sit snugly in place. Secure the chassis with the nine silver screws.
Reattach the three circuit boards in their original positions and secure them with their screws.
Carefully place the metal chassis into the main shell. Align all ports to ensure everything fits correctly, and secure it with the seven green screws.
Flip the console over, slide the bottom panel into place, and secure it with the two screws. Your Xbox Series S is now fully reassembled and clean.
✨When cleaning your Xbox Series S, focus on the exterior, vents, heatsink, cooling fan, motherboard, and power supply unit.

If not cleaned regularly, dust and debris can cause your Xbox One to overheat or malfunction.
If you don’t regularly clean your Xbox One console, dust and debris can find their way into it and cause it to malfunction and overheat. Internal parts like your cooling fan and disc drive can also be affected once dust accumulation blocks the air vents. Follow these steps to open up and remove dust and debris from your Xbox One console.
Before you start cleaning, turn off and unplug your console from the power source.

Using a microfiber cloth, gently wipe the exterior to remove dust or fingerprint smudges.
2. Using a microfiber cloth, gently wipe the exterior to remove dust or fingerprint smudges.
3. Use a soft brush to loosen the dust in and around the console’s vents, ports, and openings, then follow up with a can of compressed air to blow away the dust in these areas. Use short bursts only.
4. For those afraid to open the console, you can clean the Xbox One fan using a can of compressed air. Position the nozzle at the vent and use short bursts of air to remove any dust from the fan.
Before you start cleaning, turn off and unplug your console from the power source.

Remove the left-side vent panel using a plastic pry tool.
2. Start by removing the vent panel on the left side (the side with the Sync button). The panel sits in a recess on the outer panel and can easily be pried out using a plastic pry tool.
3. Once you remove the vent panel, remove the triangle-shaped piece under the Sync button. It’s not held in place by anything and can easily slide out.
4. Turn your console around to locate the back panel and remove the warranty sticker on the back. Use a pair of tweezers to remove it. Please note that removing this sticker could void your console’s warranty.

Place the console face down and use the pry tool to loosen the top and bottom panels.
5. Use the plastic pry tool to pry open the top and bottom panels. To do so, place the console with the front/face panel facing down, and use the pry tool to loosen the top and bottom panels. Work along the seam and release each clip by pushing down on the bottom panel while pushing the top panel in the opposite direction. Don’t yank out the top panel yet; just separate it from the bottom panel by about half an inch.

Rotate the console so that the front faces you, then lift the top panel like a pizza box.
6. To remove the top panel (still attached to the front/face panel), place the console right side up, rotate it so the front faces you, and slowly lift the top panel from the back, like opening a pizza box. The top panel should swing up and over, resting at a 90-degree angle to the console’s body. Be cautious as you do this, as a sensitive ribbon cable is attached to the front/face panel.
7. To detach the ribbon cable, place the console with the back panel facing down and gently lift the front/face panel (still attached to the top panel but detached from the bottom panel) to access the ribbon cable connector, which is a pop-in clip at the center near the “On” button. Use tweezers to gently push the top and bottom edges of the clip to release it, lift the blue wrap-around plastic, and slide the ribbon cable out. Once detached, set the top panel (still attached to the front/face panel) aside for cleaning. Once inside, the heatsink, cooling fan, motherboard, hard drive, and disk drive are the places you want to clean.
8. Once the top panel is removed, locate the speaker and Wi-Fi card. Gently pull the red and black speaker wires from the port at the back of the console, then use anti-static needle-nose pliers to carefully disconnect the Wi-Fi card’s wire from the back.
9. Locate the Wi-Fi card (black circuit board in the corner) and, using your T8 Torx screwdriver, remove the two screws holding it in place. After, gently wiggle the Wi-Fi card free from the white connector, then set it aside.

Use a T10 Torx screwdriver to unscrew the eight black screws holding the metal cover in place.
10. To access the cooling fan and motherboard, use a T10 Torx screwdriver to unscrew the eight screws holding the metal cover in place, including two on the plastic fan cover. Once done, gently open the cover from the side opposite the fan, like a book, being careful to avoid the cable connected to the motherboard. Use your hand to gently pull the connector free, and set the metal cover aside for cleaning.

The hard drive is the small metal box in a plastic stand, while the disk drive is the larger metal box connected to the motherboard with two cables.
11. Next, you’re going to remove the hard drive and disk drive. The hard drive is the smaller metal box in a plastic stand, connected to the motherboard by two cables. Disconnect these cables from the motherboard and set the hard drive aside for cleaning. The disk drive is the larger metal box attached to the motherboard with two cables. Disconnect these cables as well and place the hard drive aside for cleaning. You can now start cleaning.
12. Use a soft brush to loosen the dust stuck on the motherboard and fan, and use short bursts of condensed air to blow dust away from the components.
13. Lift the motherboard out of the bottom panel, and use a microfiber cloth or a damp cloth with soapy water to clean the inside of the plastic panel. Use a soft brush to clean the vents and openings on the panel, then finish with a blast of compressed air. Wipe down all easy-to-reach surfaces, and use the brush and compressed air for the harder-to-reach areas.
You're done. Your Xbox One console is clean, but now you need to reverse the process and reassemble the console.
Start by placing the motherboard into the bottom panel and check from the back to ensure all the USB and power ports are aligned.
Replace the hard drive and disk drive in place and reconnect their power and data cables. Then, replace and secure the metal cover with its eight screws without overtightening.
Reattach the Wi-Fi card and its wires, then replace its two screws to secure it. Reconnect the speaker’s red and black wires, too.
To reattach the ribbon cable, separate the top and front/face panels for easier access.

Left: ribbon cable connector clip open; Right: ribbon cable connector clip closed
5. Ensure the ribbon cable connector clip is open (pushed out), then carefully slide the ribbon cable into the connector and lock the clip, being mindful of the blue wrap-around piece.
6. Once fully inserted, secure the ribbon cable by wrapping the blue piece around the connector port.
7. Attach the front panel to the bottom panel.
8. Align the top panel with the front and back panels, then press along the edges and corners to secure all the clips. Check the seam along the sides where the top and bottom panels meet, and if there are any gaps, apply pressure to ensure the panel is fully seated.
9. Slide the triangle piece into its tracks and slide it back into place before snapping the side vent panel into place. Your Xbox One is now fully reassembled and clean.
✨When cleaning your Xbox One, focus on the exterior, vents, heatsink, cooling fan, motherboard, hard drive, and disk drive.

If your Xbox One S is acting up, dust may be clogging the fan, heatsink, or vents.
The Xbox One S, like the other consoles, can experience problems over time. One of the main problems is overheating, which leads to performance issues, crashes, and even damage to the console. When your Xbox One S console is acting up, it may have dust built up in the cooling fan, heatsink, or main vents. Follow these steps to open and remove dust and debris from your Xbox One S console.
Before you start cleaning, turn off and unplug your console from the power source.

Use a microfiber cloth to gently wipe the exterior to remove dust or fingerprint smudges.
2. Use a microfiber cloth to gently wipe the exterior to remove dust or fingerprint smudges.
3. Use a soft brush to loosen the dust in and around the console’s vents, ports, and openings, then follow up with a can of compressed air to blow away the dust in these areas. Use short bursts only.
4. For those afraid to open the console, you can clean the Xbox One S fan using a can of compressed air. Position the nozzle at the vent and use short bursts of air to remove any dust from the fan.
Before you start cleaning, turn off and unplug your console from the power source.

Rotate the console to find the warranty sticker at the back panel’s bottom right.
2. Rotate the console to find the warranty sticker at the back panel’s bottom right. Remove the sticker (please note that removing this sticker could void your console’s warranty), then use a pry tool to separate the black bottom panel from the white shell. Insert the pry tool into the gap between the black and white panels and work along the seam to release each clip by pushing the bottom panel down while lifting the top panel up until the bottom panel is free. Set it aside for cleaning.

Use your T10 Torx screwdriver to remove the six green screws.
3. Once the bottom panel is off, you will see the Xbox One S metal chassis, which is attached to the white shell. To separate the two, use your T10 Torx screwdriver to remove the six green screws holding them in place, then push apart the two sides of the white plastic shell to detach the chassis. Set the outer shell aside for cleaning.

The hard drive is the small metal box in a plastic stand, while the disk drive is the larger metal box connected to the motherboard with two cables.
4. Once you’ve removed the green screws, place the chassis with the fan facing you, lift off the top metal piece, and set it aside for cleaning. You should now see the power supply unit, hard drive, disk drive, motherboard, and cooling fan. Once inside, the heatsink, power supply unit, cooling fan, motherboard, hard drive, and disk drive are the places you want to clean.
5. Pull out the power supply unit, disconnect its cable connectors using the needle-nose pliers, and set it aside for cleaning.
6. Next, you’re going to remove the hard drive and disk drive. The hard drive is the smaller metal box in a plastic stand that’s connected to the motherboard by two cables. Disconnect these cables from the motherboard and set the hard drive aside for cleaning. The disk drive is the larger metal box attached to the motherboard with two cables. Disconnect these cables as well, and place the hard drive aside for cleaning. You can now start cleaning.
7. Use a soft brush to loosen the dust stuck on the motherboard and fan and use short bursts of condensed air to blow dust away from the components.
8. Use a microfiber cloth or soft-bristle brush to remove dust from the fan and its blades. Use a dust blower or compressed air to dislodge stubborn dust. If there’s any grime, wipe it away with a damp rag with soapy water or an isopropyl alcohol wipe.
9. For the heatsink, use a soft brush to loosen the dust, then follow up with a dust blower or compressed air to remove the dust and any trapped debris.
10. Use a soft brush to clean the vents and openings on the shell, then finish with a blast of compressed air. Wipe down all easy-to-reach surfaces and use the brush and compressed air for the harder-to-reach areas.
Now that your Xbox One S console is clean, you need to reverse the process and reassemble the console.
Reinstall the power supply unit. Ensure the airflow is directed toward the fan and align its feet with the copper areas.
Replace the hard drive and disk drive, and reconnect their power and data cables. Then, replace and secure the metal cover.
Carefully place the metal chassis into the main shell. Align all ports to ensure everything fits correctly and secure it with the six green screws.
Align the top panel with the bottom panel, then press along the edges and corners to secure all the clips. Check the seam along the sides where the two panels meet, and if there are any gaps, apply pressure to ensure the panel is fully seated. Your Xbox One S is now fully reassembled and clean.
✨ When cleaning your Xbox One, focus on the exterior, vents, heatsink, cooling fan, motherboard, hard drive, and disk drive.

Most Xbox controllers require nothing more than an external cleaning.
Cleaning an Xbox controller is easier than cleaning the console itself. Most Xbox controllers require nothing more than an external cleaning. While Microsoft recommends cleaning your controller every three to six months, we suggest cleaning it at least once every two weeks to prevent sweat and dust from accumulating in the crevices, which can significantly impact its performance. Yes, your controller may seem clean, but there’s a lot that your eye is missing, and that’s why you should always give it a full cleaning periodically. Follow these steps to remove sweat, dust, and debris from your Xbox controller.
Start by dislodging any surface dust, pet dander, or human hair from the face of your controller using short bursts of compressed air. Be careful not to push any crumbs or dust particles deeper into your controller.
Give your controller a rub down using the microfiber cloth. With the compressed air having removed most dust and dirt, there should be less junk sticking to your cloth. In case of grime, lightly dampen the microfiber cloth with soapy water before wiping the controller. Pay close attention to the spaces between the buttons and the thumb sticks’ undersides.
Leave your controller to dry.

Move the thumb sticks in a circular motion to ensure you thoroughly clean underneath them.
4. Use a cotton swab dipped in isopropyl alcohol to gently clean the controller’s buttons, triggers, thumb sticks, and d-pad. Move the thumb sticks in a circular motion to ensure you thoroughly clean underneath them. Repeat this step as many times as possible until all these areas are clean.
5. Leave your controller to dry.
6. Use a dry toothpick to gently scrape the seams of the controller to remove any oil or dirt stuck in there. Do the same for the d-pad, textured surface of the thumb sticks, and the battery cover, and repeat this step as many times as possible until these areas are clean.
✨Cleaning your Xbox controller is quick and straightforward, and it helps prevent sweat, dust, and grime buildup, which keeps buttons, thumb sticks, and seams performing smoothly.
Refurbished tech is tech that’s had a little TLC. Unlike used tech, these are devices that have been professionally inspected, cleaned, and restored to full working order. At Back Market, we sell professionally refurbished devices. These are devices that have been fully restored by industry experts. Every device goes through thorough testing to ensure it works like new, with worn or defective parts repaired or replaced. The benefits go beyond the lower price tag, as you get a device that performs like new while keeping perfectly good tech out of landfills, which is a win for the planet. And for extra peace of mind, you get a 1-year warranty and a 30-day return period with every purchase. So why pay more for new when refurbished offers the same service, for less?
Don’t let your old tech sit around collecting dust. Turn that iPhone, laptop, or tablet into cash with Back Market’s Trade-in program. It’s fast, it’s easy, and it’s stress-free. Respond to a few questions regarding your device online to get an instant quote, ship it to us for free, and once it’s checked, you get paid. It’s a genius way to put extra cash into your pocket while giving your gadget a second life. A win for you and a win for the planet.
Finding the right Xbox doesn’t have to cost a fortune. Whether you’re after the latest Series X powerhouse, the sleek Series S, or a trusty Xbox One, there’s an option to match your preference and budget. All our refurbished Xbox consoles are tested, cleaned, and work like new, at only a fraction of the price (20-50% off). Here are some of our best picks:
Model | Price of new | Back Market Starting Price | Percentage saved |
|---|---|---|---|
$999.99 | $38 | 96.2% | |
$20 | $238 | 88.1% | |
$9,999 | $155 | 98.45% | |
$799 | $217.60 | 72.77% |
Keeping your Xbox console clean is essential for maintaining optimal performance and longevity. Dust, dirt, and debris that accumulate over time often lead to excessive noise and overheating. By regularly cleaning your Xbox, you ensure proper airflow and cooling. Plus, a clean Xbox just looks better. And remember, whether it’s refurbishment or repair, count on us to give your devices a second life.

Miguel is always looking for new ways to provide unique perspective on popular tech and has taken his writing to the refurbished industry to promote sustainability. Outside of creating content, you might find him travelling the globe, coaching a fitness class, or cheering on his favorite sports teams (Go Dolphins!)